Uncategorized

EBS and RDS snapshot management script for Amazon AWS

NB: When I became IT Director at work this year my team of brainy software engineers, who are much cleverer than me, forced me to retire from coding after 30 years experience (20 of them commercial). It doesn’t mean I can’t code any more, obviously, but it isn’t my day job any more and so I can’t promise that I’m fully up-to-date with the best methods and techniques any more.

ebs-snapshot-repositoryWe run a number of workloads in Amazon AWS, which many do these days, and one of the common things you have to think about it snapshots for your Elastic Block Store (EBS) volumes and Relational Database Service (RDS) instances. You can create these manually through the console, which is obviously a painful ball-ache if you want to introduce any sort of schedule whatsoever, or you can automate it, since every action on AWS is operable through their awesome API.

For a couple of years we used a commercial EC2 appliance to do this for us. It cost $1,800 per year. It wasn’t particularly pretty but it was easy enough to use and it did the job. But all it did was consume the AWS API on a schedule; it didn’t do anything particularly clever and certainly nothing that I wasn’t capable of doing myself by consuming the API directly. So I’ve replaced with a script which I’ve grown myself and now I’ve been testing it for a month or so I’m happy that it works.

I thought perhaps that others might find this useful too, especially if they want to save $1,800 per year, so here it is:

It has Composer dependencies, so satisfy them and then create an AWS key/secret pair which has access to EC2 and RDS. Enter these credentials into credentials.json. Using the standard policies AWSEC2FullAccess and AWSRDSFullAccess achieve this although you might want to create a custom policy which only allows listing of volumes and instances and the creation and deletion of snapshots, up to you and how anal you are about the scope of your AWS keys.

Then you’ll need to edit the schedule, which is in the execute() method. If people want me to I’ll refactor the schedule definition out into a JSON file, but in the meantime you’ll need to get familiar with the PHP date() function. The default schedule is as follows:

// EBS snapshots

// every day at 8pm, 7 day retention
if (date('G') == 20) $this->snapshotEBS(7); 

// every sunday at midnight, 4 week retention
if (date('D') == 'Sun' && date('G') == 0) $this->snapshotEBS(28); 

// every month, 12 month retention
if (date('j') == 1 && date('G') == 0) $this->snapshotEBS(360); 

// RDS snapshots

// every two hours, 1 day retention
if (in_array(date('G'), [1,3,5,7,9,11,13,15,17,19,21,23])) $this->snapshotRDS(1);

// every day at 8pm, 7 day retention
if (date('G') == 20) $this->snapshotRDS(7); 

// every sunday at midnight, 4 week retention
if (date('D') == 'Sun' && date('G') == 0) $this->snapshotRDS(28); 

// every month, 12 month retention
if (date('j') == 1 && date('G') == 0) $this->snapshotRDS(360); 

Run it every hour from the cron. Suggested crontab entry:

0 * * * * php /path/to/aws-snapshot-manager.php

It works properly and is reliable so long as cron doesn’t fall over and your AWS credentials don’t get rusty for some reason. However, its biggest weakness is that you won’t get told if it fails for any reason, which I guess would be the major improvement that it requires. It would need to be able to send alerts, by e-mail, SNS topic or SQS queue, in the event of a problem. So use at your own risk and periodically jump onto the AWS console to make sure your snapshots are up to date.

Don’t forget that AWS will charge you for snapshot storage space (EBS pricing, RDS pricing). Bear this in mind when defining your schedule and don’t wave your AWS bill in my face, I don’t want to see it.

PS: I realise that this is very boring to non-AWS people and I also realise that the AWS snapshot icon looks like a toilet.
Uncategorized

Home energy monitor reveals consumption horrors

I’ve moved flat recently (all planned, fancied an upgrade and the right opportunity came along), and my new flat is situated close to to the cupboard on my floor where the electricity meters are kept. This differs from previous apartment buildings in which I have lived because in those buildings the meters were all in the basement, far far away from the apartment itself. This prevented me from using an energy monitor, because for them to work you need to install a transmitter on the meter and that transmitter needs to be within a certain distance of the receiver inside the apartment.

Keen to work out why I kept getting over usage bills from my own employer, I bought an Owl Intuition-E and Micro+ bundle, which gave me the transmitter, the receiver and a network receiver, which allows me to upload usage data over the Internet to their online portal for analysis. Being within 30 metres of the meter, it works a treat.

I was a little surprised, however, with the results it gave me. I’ve found out the following:

  1. My television, surround sound and Bluray setup in the living room uses 60W on standby. 525 kWh per year (£78.75). I put a remote controlled socket on that lot straight away. I have no idea why 60W is necessary to keep four items AV equipment on standby.
  2. The TV / stereo setup in the bedroom uses 16W on standby. Another 140 kWh per year (£21.00) saved with another remote socket.
  3. I use a minimum of 241W. It never goes below that. This is during the day with no lights on (not that they bother me much, they’re all LED), with the fridge/freezer on (60W), my server and networking gear on (90W – this is lean, trust me) and my desktop computer on (60W), but with my monitors and everything else switched off. This means that there’s still 31W of background usage, 24 hours per day (271 kWh per year, £40.73).
  4. Consumption has been as high as > 9kW. This, presumably, was when I had the water heater and the cooker and the microwave and the telly on at the same time. Fortunately periods like this are always short-lived.

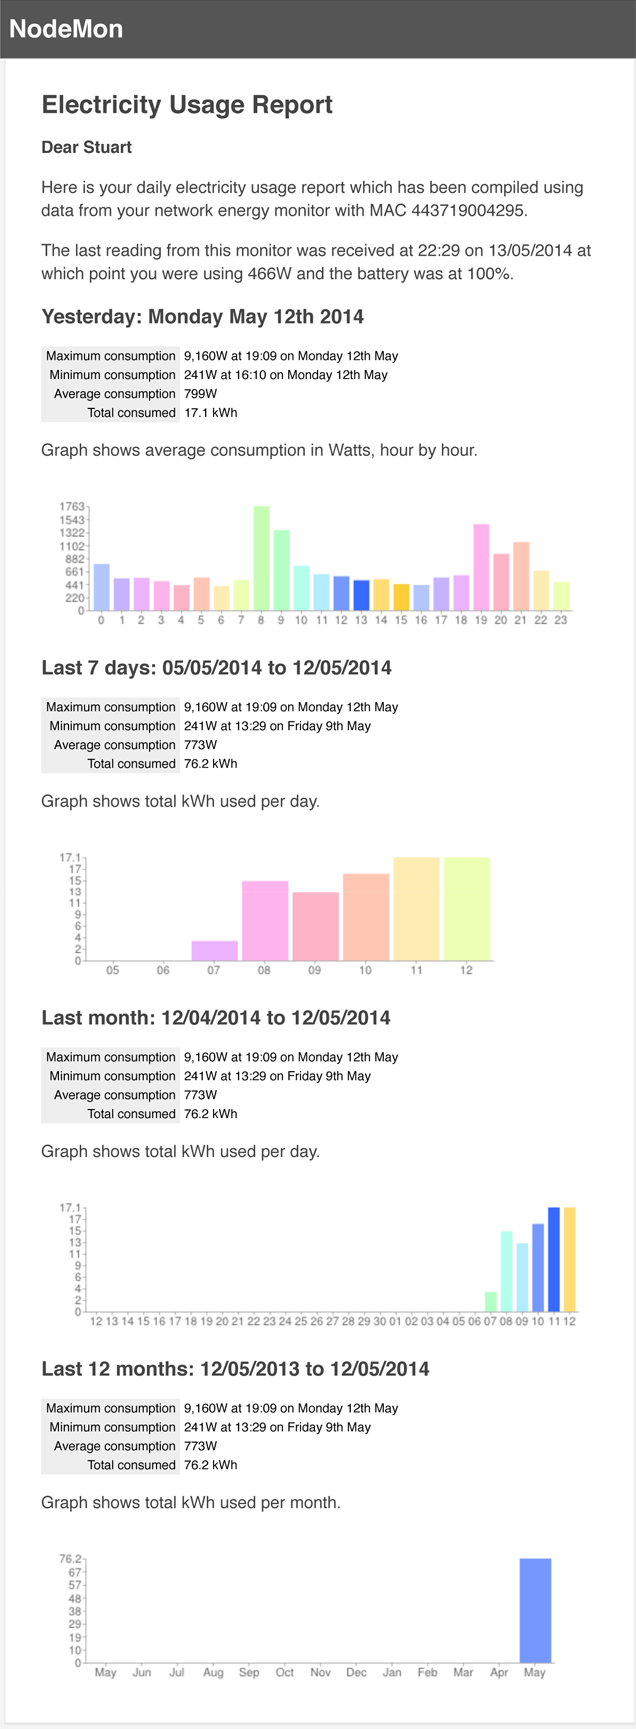
It’s a really good product, works very well, but I absolutely hate the web portal you have to log in to view your statistics. It’s awful. Fortunately, the network device can be configured to also sends its readings to a specified IP address on a specified UDP port, which is exactly what I’ve done and I store all my readings in a local database with a collector listening on that port. I then wrote my own software to analyse it and now I get a report like this every day. To this I have also added a web browser dashboard.

daily-electricity-report

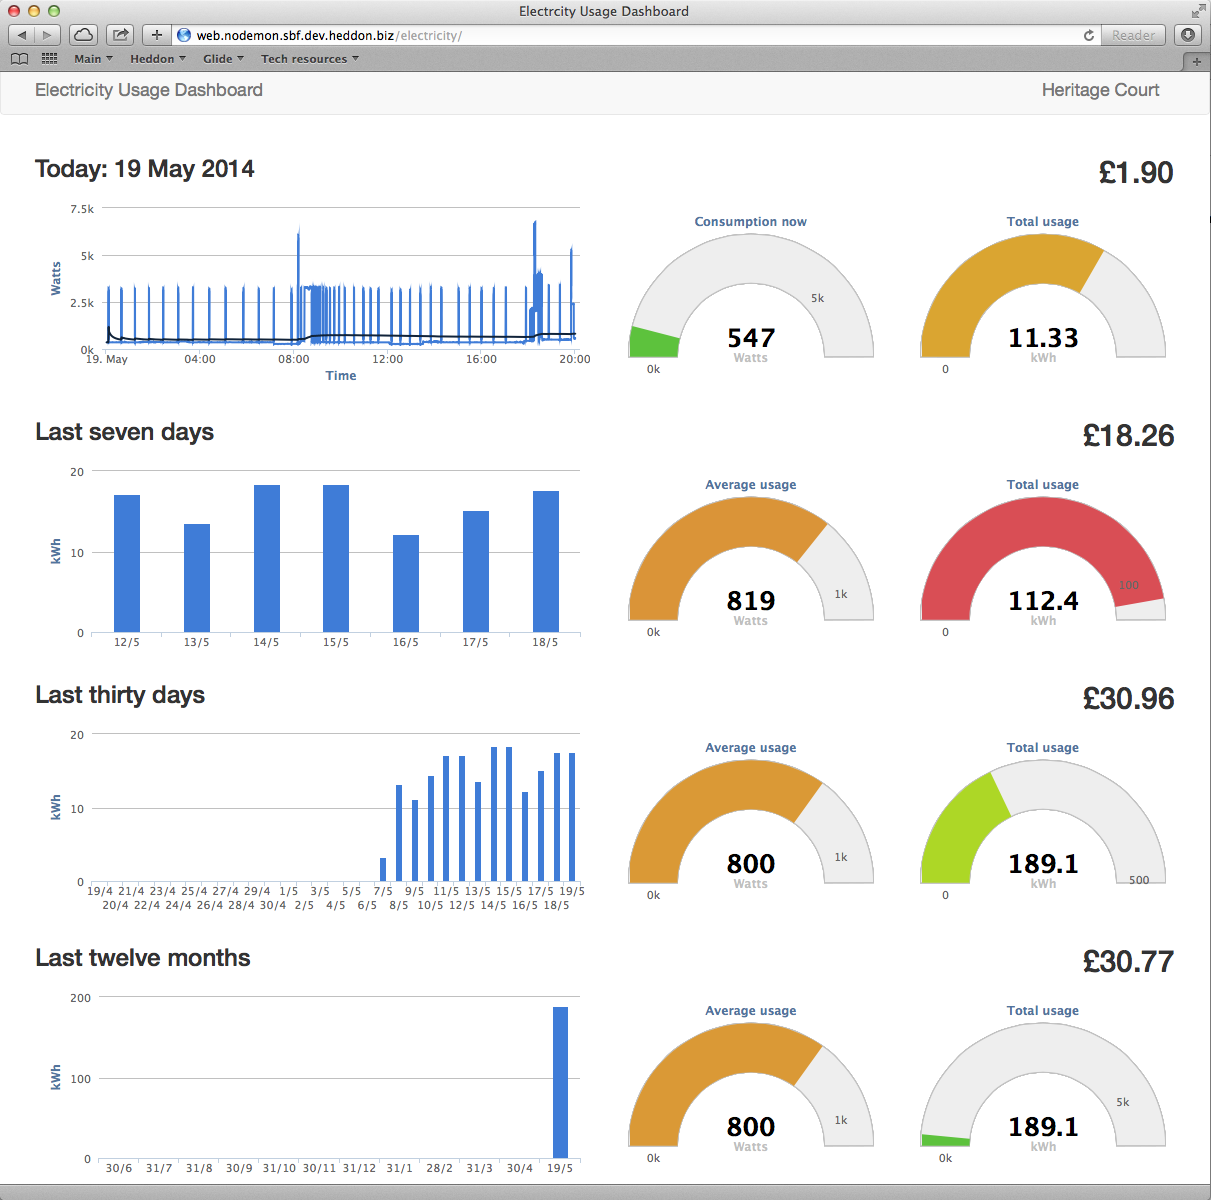
Update 19/05/2014: I’ve now created a web dashboard (which also works well on mobile devices).

Screen Shot 2014-05-19 at 20.03.27

Code’s here if you’re interested (NodeMon isn’t really a thing, just a project framework for various bits of tinkering). Needs Phalcon.

Uncategorized

A very Angular learning curve

Recently my team at work have been working with Angular JS, a Javascript framework created, used and published by Google. We’ve used it extensively in our new website, which is created from static HTML and Javascript files with no server-side page generation. All the work is done by the browser and user interaction is processed using a REST API.

AngularJS-large

I didn’t actually do any of the coding on the website and so I did not have the opportunity to learn how to use Angular JS during the project as the rest of my team did, so in order that I did not fall behind on the skill I decided to learn it myself in my own time by creating a web-based tool which creates DHCPd configuration files. The application is boring (although actually useful if you run such a server), but that’s not the point, it was a learning exercise.

Angular JS has a bit of a learning curve. It works in different ways to other Javascript libraries and frameworks and it takes a while when you’ve started from scratch to “think Angular”, rather than in ways in which you may have become accustomed with things like jQuery, itself revolutionary in the world of Javascript, but Angular takes it to a whole new level. Once you are “thinking Angular” things become much clearer and easier and you find yourself in a very natural-feeling flow.

I’ve made the exercise available on Github. You may find the tool itself useful if you’re a system administrator, but if you’re a developer it’s more likely the demonstration of a simple Angular application that you will probably see more value in.

I have some larger extra-curricular projects around the corner which I intend to base on Angular JS and expand my knowledge. We’ll also continue to use it at work and will almost certainly use it when it comes to re-implementing the user interface of the company’s internal browser-based management system.

Uncategorized

MRTG Dashboard

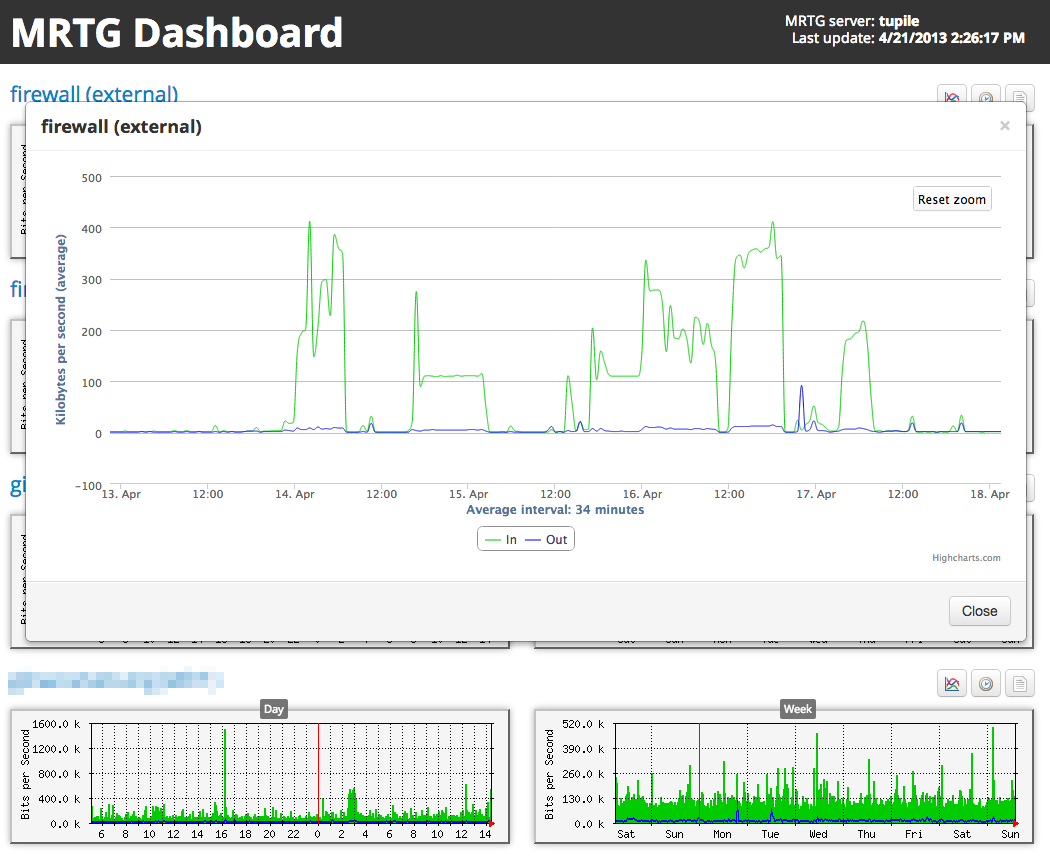
I’m one of those die-hards whose been using MRTG for almost as long as I’ve had a computer with a network connection. It’s an old tool for monitoring network traffic and its not pretty by modern standards but it does still do that job very well. However, its blocky output does rather leave much to be desired in this day and age of interactivity and so I’ve knocked together an MRTG Dashboard.

It’s a single PHP script which you just pop in your MRTG output directory (workdir) on your PHP-enabled web server. That’s all you need, all the required libraries are loaded from CDNs. It’s not perfect, but it is an improvement.

MRTG Dashboard screenshot

MRTG Dashboard screenshot

You will find that the timescales on the interactive graphs can be a little hit-and-miss. This is because while Highcharts demands data at consistent intervals when creating time-based graphs MRTG’s data is anything but consistently intervalled. I will try to improve this at some point in the future.

You can get MRTG Dashboard from Github.

Uncategorized

Mac, Apache, MySQL and PHP (MAMP)

Mac OS X serves as an excellent development environment, even if you are not actually developing Mac OS or iOS applications. It is the darling of many a LAMP (Linux, Apache, MySQL and PHP) developer, who enjoys a slick desktop operating system with good UNIX-like underpinnings but who don’t necessarily want to put up with all the various limitations and complications that running a Linux desktop brings, consistent improvements in this regard over recent years notwithstanding.

The only trouble with this is that if you want to develop LAMP applications and work on a Mac then traditionally you’ve needed a two-box setup; a Mac on your desk and Linux on a development server. For many this isn’t an issue, and indeed when you’ve got a team of developers, optimal, but what if you wanted a self-contained development environment that was restricted to just one box? What if you wanted that box to be your laptop so you could take it anywhere?

Solutions

“Virtual machine!”, I hear you cry. Yes, this is a possible solution, and for many works well. Good virtualisation software is free these days, but using a local VM is cumbersome. Not only does it consume a large slice of your RAM but it also puts a lot of strain on the CPU, meaning that if you are running off your battery your battery life will be decreased. It’s also cumbersome; you have to start up the VM when you need it and there can be complications with the networking, for example, if you have connected to a public wireless network it’s possible that your VM might not be extended the same resource.

There is a software package for Mac OS called MAMP (the M for Mac OS replacing the L for Linux). This is a point-and-click installer which bundles Apache, Linux and PHP for installation on Mac OS. I don’t like this solution, for a number of reasons, including:

  1. Limited functionality unless you “go pro” (at quite considerable cost). Any self-respecting developer will require multiple virtual hosts as a minimum and won’t need or want a clicky-button interface to get what they want.
  2. You are entirely at the mercy of the distributors of MAMP with regards to component software versions that are made available to you and when.

Alternative solution

There’s an alternative to this. You don’t have to fork out £39 for a package of what it otherwise freely and widely available software. With the help of my friend and colleague Ben Nimmo I present the following assembled and tested instructions for turning your Mac into a native MAMP server without using the packages download.

MySQL

  1. Download and install the latest .dmg and install both the *.pkgs within it (don’t use the TAR/GZ archives). You may wish to install the Workbench too, it’s really good these days.
  2. Find where the mysql.sock file is expected to be in /etc/php.ini (should be /var/mysql/mysql.sock)
  3. Create the folder and link the socket file to the expected location.
sudo mkdir /var/mysql
sudo ln -s /private/tmp/mysql.sock /var/mysql/mysql.sock
  1. Add MySQL to command line by editing /Users/username/.bash_profile and adding this line and then either restarting terminal or source-ing the file:
export PATH=$PATH:/usr/local/mysql/bin

PHP

PHP comes with Mac OS, so it’s not necessary to download and install it, however, there are a couple of necessary steps to configure it:

  1. Copy the default php.ini file:
sudo cp /etc/php.ini.default to /etc/php.ini
  1. Edit /etc/php.ini and uncomment this line to enable xdebug (not essential, but recommended):
zend_extension="/usr/lib/php/extensions/no-debug-non-zts-20090626/xdebug.so"

Apache

Apache too comes with Mac OS, so again, no need to download and install it. Its configuration, however, is a little more complex, but nothing scary. The described configuration will provide a special Apache “sandbox” environment for your projects. It uses the existing “Sites” directory in your Mac OS home directory.

  1. Create a subdirectory in this directory for each of your projects, ensuring that the directory name does not contain any characters that would be illegal in a URL. Within each of these subdirectories create another subdirectory called “web”; this will be become the web root of each project. The extra subdirectory is in case you wish to use a framework in your projects which may keep some of its files outside of the web server root (Symfony is a good example of this).
  2. Create a subdirectory called “logs” in your “Sites” directory; Apache will maintain two log files, access and error, for all the sandbox sites.
  3. Enable PHP5 with Apache by editing /etc/apache2/httpd.conf and uncomment the following line:
LoadModule php5_module libexec/apache2/libphp5.so
  1. Change the user and group to your username and “staff” respectively, also in /etc/apache2/httpd.conf:
User sbf
Group staff
  1. While still in /etc/apache2/httpd.conf, find the following configuration and change “Deny from all” to “Allow from all”:
<Directory />
    Options FollowSymLinks
    AllowOverride None
    Order deny,allow
    Deny from all
</Directory>
  1. Create and edit /etc/apache/users/user.conf with the following, changing “sbf” to the username:
<VirtualHost *:80>

    ServerName dev.local
    DocumentRoot /Users/sbf/Sites/

    RewriteEngine on
    RewriteLogLevel 1
    RewriteLog /var/log/apache2/rewrite.log

    # sites in the format http://[site].dev.local
    RewriteCond %{HTTP_HOST} ^[^.]+\.dev\.local
    RewriteCond %{REQUEST_URI} !^/error/.*
    RewriteCond %{REQUEST_URI} !^/icons/.*
    RewriteRule ^(.+) %{HTTP_HOST}$1 [C]
    RewriteRule ^([^.]+)\.dev\.local/(.*) /Users/sbf/Sites/$1/web/$2

    # Logging
    CustomLog /Users/sbf/Sites/logs/sandbox.access.log combined
    ErrorLog /Users/sbf/Sites/logs/sandbox.error.log

</VirtualHost>
  1. Restart Apache:
sudo apachectl restart

Then, for each of your sites, add an entry in /etc/hosts for with the format “name.dev.local” pointing to 127.0.0.1, where name corresponds to a subdirectory in your “Sites” directory. Don’t forget that the public subdirectory of each site is assumed to be “web”, so make a symlink to this if the framework you use has a different convention.

You should then be able to access each of your sites from URLs using the convention http://name.dev.local/ – where “name” again is a subdirectory within your “Sites” directory.

I’ve tested this setup procedure and It Works For Me [tm]. If, however, it doesn’t quite work for you as described, please let me know where you’re going wrong and how, if you were able, to resolve it, and I will update these instructions accordingly.

Uncategorized

Call centre HUD for Asterisk

At work every fortnight or so we hold what we call Evenings Of Code. The company buys the development team pizza and beer and in exchange we work on projects and ideas that are of special or particular interest to us, that the company would benefit from, but that the company doesn’t really need at the moment and so normal weekday work time cannot be allocated to it.

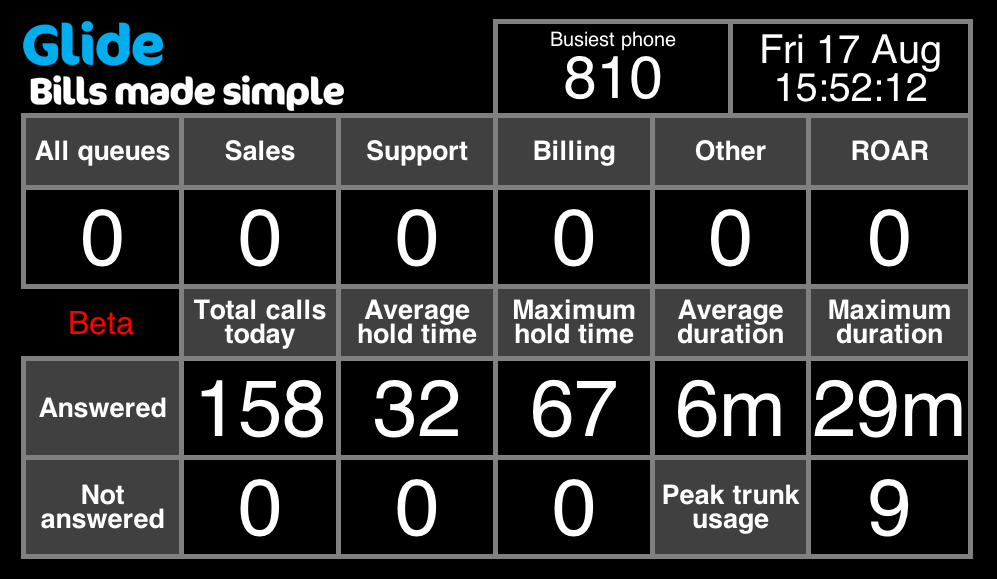
My recent project has been to create a HUD (Heads-Up Display) for the call centre. I’m particularly suited to do this out of those in my team because I have quite a lot of experience with Asterisk, the popular open-source PBX, on which the company’s telephone system is based. The system, designed for a 1080p display (it’s not yet decided whether we’re going to go for a plasma or a projector yet), uses caller details records (CDRs) and the Asterisk Manager system to gather statistics on the day’s calls. It’s not quite realtime, but the key queue statistics from the Manager are updated every five seconds and the cumulative statistics based on the CDRs since midnight every 20 seconds.

A script runs constantly in the background during the working day (8.00am to 8.00pm) to perform the updates, which saves the results in a database table. The HUD itself is then loaded in a browser and uses AJAX calls every five seconds to read the contents of this table. This will allow multiple instances of the HUD to run without each hammering the CDRs and the Manager. At the moment, as it’s in testing, it’s being loaded into web browsers by certain staff members, and so when it initially loads it loads quarter-size. When we finally put it up on the wall we would then hover over the top right corner and an option will appear to enlarge it to full 1080p, basically by doubling the values in key CSS properties.

It looks slick too. Because it uses AJAX there are no page loads, you would expect nothing less in this day and age. If a digit changes after retrieving an update then the old digit is faded out before the new digit is faded in. If a digit doesn’t change between updates it obviously remains static.

We’re now trying to ascertain whether my algorithms for calculating the statistics are accurate at the moment by using a bit of manual record keeping on the part of the cell centre staff, who have been asked to record the number of calls they are taking per day for a week or so, independently of the records on the PBX. I’m confident that I’ve got it right, however, and actually quite pleased the information that I have been able to calculate given that Asterisk CDRs aren’t all that great to work with.

Assuming the project gets full approval following testing my intention is to get it running on a Raspberry Pi, which can be strapped to the back of the screen or on top of the projector, or indeed easily hidden in the ceiling in either case. Given that modern screens and projectors come with USB ports they will even be able to supply power to the Raspberry Pi. This means that the screen or the projector, whichever is chosen, represents the largest cost of the project as the Raspberry Pi eliminates the need to dedicate a whole PC for the purpose. My research indicates that the Raspberry Pi is capable of running Google Chrome, so that’s all good.

Screenshot of the system during a quiet period (no calls in the queues)

Uncategorized

Python SimpleHTTPServer

I don’t use Python on a daily basis, barely at all in fact (knowingly), but I stumbled across a handy purpose for it today which I see myself using. Type this command in a Linux shell or a Mac OS terminal and it will start a local web server on port 8000 using the current working directory as the document root and sending access requests to STDOUT:

python -m SimpleHTTPServer 8000

Potential uses include:

  1. Developing local web applications on the local filesystem which use no server-side processing but do use Javascript and AJAX calls that a web browser would not normally allow without starting it with special flags (anyone who’s seen “XMLHttpRequest cannot load $RESOURCE. Origin null is not allowed by Access-Control-Allow-Origin” in their error console will know what I’m talking about).
  2. Quickly sharing a directory with a colleague on the same network rather than uploading files to a shared resource such as a file server or e-mail system. Obviously you’d need to ensure that whatever port you choose is allowed in your local incoming firewall if you have one.

There’s even better news for PHP users. PHP 5.4, released this week, includes a built-in web server which can be started with an equivalent command. The advantages of this of course is that it’ll also process PHP scripts instead of being limited to static files.

Uncategorized

Cadburys Olympic Podium Clock

I worked on a couple of extra-curricular projects over Christmas, one being a a project for Cadburys, who are touring the country over the next six months before the Olympic Games with three podium-style stands on which punters can attempt to win one of ten pairs of tickets to the opening ceremony by estimating how long exactly 20.12 seconds is. These will appear in various shopping centres and exhibitions over the months.

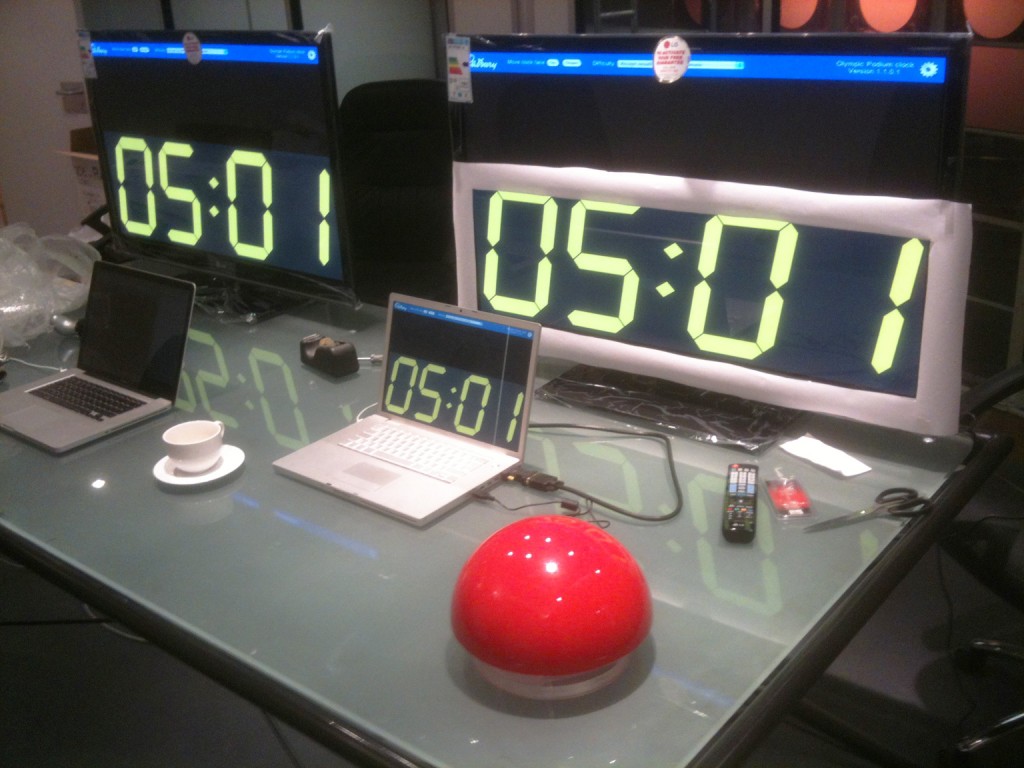
Punters press the big red comedy button to start and press it again to stop, and no, they don’t have view of the screen while they’re playing. If they win there’s a winning sequence of sounds and words on the display and the operator also activates four flashing purple police lights. It’s pretty much impossible to estimate correctly, however, even if you do have sight of the screen.

My job was to create the software for this including all the graphics, which I did using my normal skill-set of HTML, CSS and Javascript/jQuery (no server-side stuff required, runs on a laptop without an Internet connection). I’m also able to push out software updates to each of the three stands over the next six months should they for some reason become necessary.

The screens in the photo below will be installed within the podium-style stands themselves and only the clock digits themselves will be visible through the aperture in the front (simulated by the crude paper surround on the screen on the right). The purple bar at the top of the screens is only visible on the operator’s laptop and contains some basic options and settings which aren’t publicly visible. The red button is custom built and contains a USB numeric keypad with a mechanism that presses the “5” key. This then simply plugs into the laptop as a USB keyboard.

It was a nice bit of fun. It’s not a million miles away from the sort of things I used to do when I worked for 2Heads back in 2000/2001, so almost a little nostalgic. No plugins or flash either, all HTML5, CSS3 and jQuery, as it should be.

Testing the displays and the comedy red button

In action in the Birmingham Bullring during March 2012

1 2 3